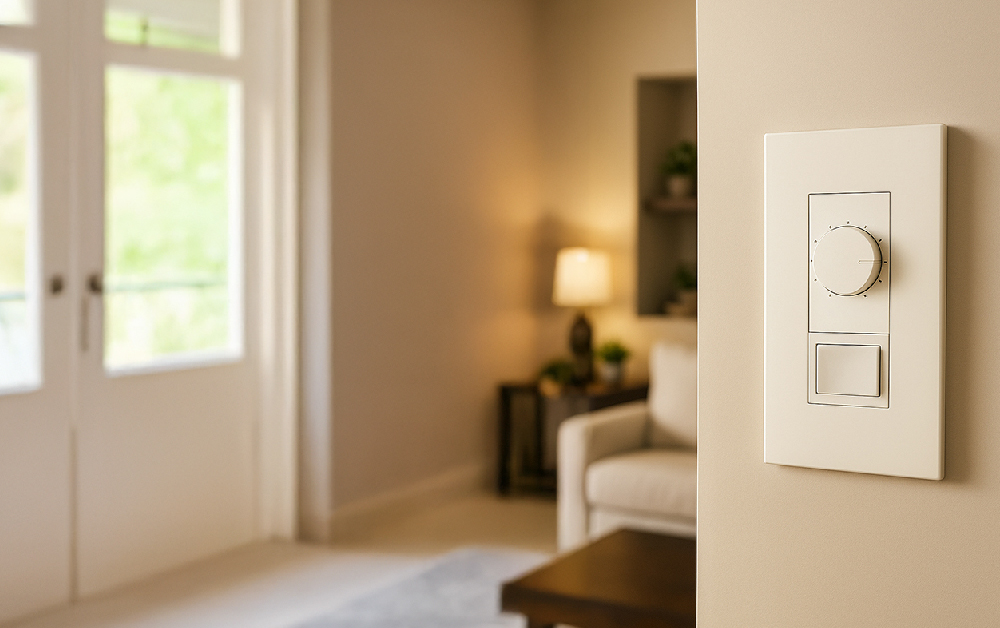

Wiring a dimmer switch is a practical way to instantly elevate your home’s atmosphere while saving energy. Whether you want a cozy evening vibe or more flexible brightness control for your workspace, learning to wire a dimmer correctly helps you create the lighting scene you want. It can look a bit intimidating at first, but this guide breaks the process into simple steps so even beginners can complete this rewarding DIY project with confidence.
Beyond the basics, we’ll also cover essential safety tips to keep your project solid and secure. Safety comes first when working with wiring—knowing the right tools and proper connections helps you avoid accidents and costly mistakes. We’ll also explain the key points of 3-way dimmer wiring, which lets you control the same light from multiple locations—perfect for hallways or large rooms. With this knowledge, you’ll boost both function and aesthetics at home.
If you hit a snag—don’t stress. We’ve included a troubleshooting section at the end to help you quickly fix common issues. By the time you finish this guide, you’ll see that dimmer switch wiring is not only doable—it’s actually a fun way to upgrade your living space. Ready to light your home with more flexibility? Let’s get started.
How to Wire a Dimmer Switch: Quick Start
Installing a dimmer switch can immediately improve ambiance and cut energy use. Swapping a standard switch for a dimmer is a great DIY project; in most cases, you can finish in about 15 minutes by following these steps.
Tools You’ll Need
- Dimmer switch — Choose what you need (e.g., Single-Pole or 3-Way).
- Voltage tester — Confirm power is off before you touch any wires.
- Screwdriver — Remove the wall plate and secure the switch.
- Wire caps (wire nuts) — Safely connect and cover wires.
- Additional wire — If needed for proper connections.
Step-by-Step
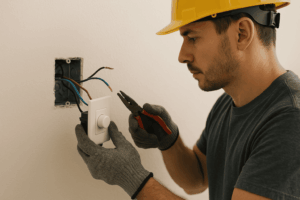
(1) Turn off power
Shut off the matching circuit at the breaker panel, then use a voltage tester to make sure there’s no power at the switch. This is the most critical safety step.
(2) Remove the old switch
Unscrew the plate and pull the switch out of the box.
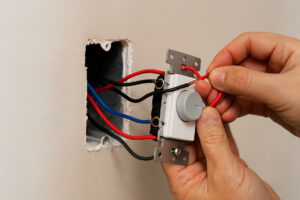
(3) Identify the wires
Typical colors and functions:
Black: Live / load input (hot)White: NeutralRed: Traveler (common in 3-way circuits)Bare copper: Ground (if present)
(4) Connect the dimmer switch
Follow the wiring diagram included with your dimmer. Basics:Single-Pole: Connect the black live wire to the dimmer’s input; connect the dimmer’s output to the fixture’s black wire; tie white neutrals together.3-Way: Connect the two traveler wires (often red) to the dimmer’s traveler terminals. Cap any unused wires securely.
(5) Secure connections
Cover all connections with wire caps and tighten firmly for a safe, reliable connection.
(6) Mount the dimmer
Gently tuck wires back into the box and screw the dimmer in place.
(7) Restore power & test
Turn the breaker back on and test for smooth dimming.
Common Dimmer Types
| Dimmer Type | Description | Best For |
|---|---|---|
| Single Pole | Controls one light from one location | Most standard rooms |
| 3-Way | Controls one light from two locations | Hallways, large rooms |
| Smart | App/voice remote control | Modern smart homes |
Compatibility Notes
Make sure your dimmer and bulbs are compatible. For example:
- Compatible: Incandescent, halogen, and trailing-edge dimmable LEDs.
- Not compatible: Leading-edge dimmable LEDs, smart LEDs with built-in dimming, and low-voltage fixtures without the right driver.
If you’re unsure, check the product specs or ask a qualified professional.
Greattop Quick-Match Guide — Pick the Right Dimmer
| Greattop Series | Control Method | Where It Shines | Quick Tip |
|---|---|---|---|
| Triac Dimmer | Phase-cut (trailing / leading) | Homes, LED retrofit | Versatile—always check your LED compatibility list |
| 1–10V Dimmer | Analog voltage | Offices, meeting rooms | Best when many fixtures must track the same brightness |
| PWM Dimmer | Pulse-width modulation | Retail, industrial | Pleasant low-frequency perception; stable CCT at low dim levels |
| Bluetooth Dimmer | Wireless / App control | Smart homes, warehouses | App scenes + wall control; handy for multi-entry spaces |
Explore more: Triac Dimmer · 1–10V Dimmer · PWM Dimmer · Bluetooth Dimmer
Follow the steps above and you’ll wire your dimmer successfully—then enjoy the freedom to set the perfect brightness for any moment.
Safety Essentials for Dimmer Wiring
Safety is always the top priority. Stick to these core rules for a smooth, accident-free install:
- Turn off power: Always switch off the breaker first to prevent shock.
- Use a voltage tester: After shutting power, confirm conductors are truly de-energized.
- Understanding Wire ColorsGet familiar with wire colors and their functions. In Taiwan, the common color codes are:
Black for live or hot wires
White for neutral
Green/Yellow for ground
。For U.S. Readers: In North America, the typical wire colors are: Black / Red = Hot (Live)、White = Neutral、Green or Bare Copper = GroundPlease follow local regulations and the equipment’s wiring instructions to ensure safety and compliance.
- Follow the manufacturer’s guide: Every dimmer model has specific instructions.
- Check bulb compatibility: Not all bulbs dim well. Incandescent/halogen usually do; leading-edge LED dimming often flickers—verify before installing.
- Have the right tools: Screwdrivers, wire caps, spare conductors, etc.
- Make solid connections: Tighten and cap all joints to prevent arcing or electrical fires.
- Avoid overload: Keep total wattage within the dimmer’s rating.
- Ask a pro if unsure: Consult a licensed electrician.
- Test and verify: After restoring power, confirm smooth, flicker-free dimming.
3-Way Dimmer Wiring: What Matters & How to Do It
3-way dimming looks complex at first, but with the right method and tools, it’s very manageable. Here’s what to prepare and how to proceed.
You’ll Need
- Voltage tester
- Screwdriver
- Illumino dimmer or another compatible brand
- Spare wire caps
- Two short neutral (white) wires
Basic Steps
(1) Turn off power: Switch off the breaker for the circuit.
(2) Identify conductors:
- Black: AC live or load input
- White: AC neutral
- Red: Traveler
- Bare copper: Ground (if present; may be unused in some cases)
(3) Connect the dimmer:
- Install the dimmer at one end—commonly on the side with a “black-yellow-yellow” run (often the remote end).
- Note: Do not put two 3-way dimmers on the same circuit; use one dimmer + one standard 3-way switch.
(4) External switch compatibility
- Standard toggle or momentary switches usually work. Avoid using another dimmer as the companion switch.
(5) Bulb compatibility:
- Best: Incandescent, halogen, trailing-edge dimmable LEDs.
- Commonly incompatible: Leading-edge dimmable LEDs, low-voltage fixtures without proper drivers, and self-dimming smart bulbs.
Wiring Reference Table
| Wire Color | Function | Connect To |
|---|---|---|
| Black | AC live or load input | Dimmer Live terminal |
| White | AC neutral | Dimmer Neutral terminal |
| Red | Traveler | Traveler terminal between both switches |
| Bare | Ground (if present) | Dimmer Ground terminal |
Smart option: You can also use a smart dimmer with Bluetooth. One side uses a wired dimmer, and the other side is controlled wirelessly—reducing complex cabling and perfect for multi-point control.
You can also opt for a smart dimmer, which can be controlled via Bluetooth. Bluetooth allowing control via Bluetooth; one end requires only a wired dimmer, while the other can be operated wirelessly — reducing complex wiring and making it ideal for spaces that require multi-point control.
Troubleshooting Common Dimmer Wiring Issues
If something’s off, walk through this checklist to pinpoint the cause quickly.
- Quick Checks LED Compatibility
- What to check: Are your LEDs compatible with the dimmer?
- Common symptom: Flicker at low brightness.
- Fix: Use trailing-edge dimmable LEDs; avoid leading-edge or non-dimmable LEDs.
- Wiring Connections
- What to check: Loose connections or wrong terminals.
- Fix: Re-verify colors and terminals; tighten wire caps.
- Measure Voltage
- What to check: Is there power at the switch?
- Fix: Check the breaker and rule out wiring faults.
- Load Matching
- What to check: Is total wattage within the dimmer’s rating?
- Fix: Reduce the number of fixtures or use a higher-rated dimmer.
- 3-Way Pairing
- What to check: Are you using one dimmer + one 3-way switch?
- Fix: Follow the manufacturer’s wiring diagram precisely.
- Dimmer Protocol Fit
- What to check: Does the dimmer type (standard/smart/1–10V/PWM/Triac) match the fixture/driver?
- Fix: Pair the dimmer to the correct fixture/driver protocol.
- Remote Control IssuesWhat to check:
Battery and pairing status.Fix: Replace the battery and re-pair.
- What to check: Battery and pairing status.
- Fix: Replace the battery and re-pair the device.
Quick Reference Table
| Issue | Likely Cause | Fix |
|---|---|---|
| Flicker at low brightness | LED not compatible | Switch to trailing-edge dimmable LEDs |
| No power / no response | Tripped breaker or wiring fault | Reset breaker / recheck wiring |
| Dimmer not working | Incorrect wiring | Verify wire colors & terminals |
| Dimmer overload | Over rated wattage | Reduce load or upgrade dimmer rating |
| Remote not working | Dead battery / not paired | Replace battery & re-pair |
Conclusion
Mastering dimmer switch wiring clearly upgrades both the feel and control of your lighting. Follow the steps here to efficiently replace a standard wall switch with a dimmer—always prioritize safety (power off, test for voltage, secure connections). Then ensure dimmer-to-bulb compatibility—especially with LEDs—to avoid flicker and instability.
If you’re ready for more flexibility, 3-way dimming adds multi-point control. Stick to the key principles and avoid common pitfalls, and you’ll complete it smoothly. If issues pop up, work through the troubleshooting checklist to save time.
Fast Selection Tips:
Triac: Usually best for residential. 1–10V: Top choice for offices/classrooms with uniform group control. PWM: Great for retail/industrial when low-frequency comfort and stable CCT matter. Bluetooth: Most flexible for smart homes/warehouses with complex paths and multi-scene control.
.Offices and classrooms, which require consistent brightness and group control, are best served with 1–10V dimmers.
1–10V.Retail and industrial environments that value low flicker and stable color temperature are recommended to use PWM dimmers. PWM.For smart homes and warehouses with complex layouts or multi-point scene control, Bluetooth dimmers offer the greatest flexibility.
Bluetooth 最彈性。Explore more: Triac Dimmer · 1–10V · PWM · Bluetooth —— If you’re unsure which type to choose, feel free to contact us — we’ll help you find the right solution quickly.